The G Cloud app provides a secure and user-friendly platform to explore, access, and manage your backed-up data on various devices. This guide outlines how to navigate through your stored data on Android and iOS devices, as well as through the G Cloud web console. Whether it’s photos, videos, music, or documents, G Cloud makes it easy to browse, retrieve, and manage your files. Following these steps will ensure that you can explore your valuable content with ease, verify that your files are safely stored, and leverage options to share or restore your data whenever needed.
Exploring Data via the G Cloud App on an Android Device
Step 1. Ensure that your G Cloud app is updated to the latest version.
Step 2. Open the G Cloud app and wait for the “Syncing files with server…” process to complete.
Step 3. Viewing Photos & Videos
On the Home screen, all backed-up photos and videos from all devices are displayed by default.
- Files are sorted by date in descending order and grouped by day for easy navigation.
- While scrolling, a navigation timeline will be displayed, allowing you to easily navigate between years.
- Use the All, Favorites, Images, and Videos options to filter files by type.
- Open a photo or play a video by tapping on its thumbnail. Once opened, you can share it, download it, add it to an album, add it to your favorites, edit it, delete it from the backup, or display its information.
- For bulk actions, select multiple files by long-pressing one file and proceed with selecting the others. This enables options to share, add to an album, download, delete, or restore the selected files in one action.
Step 4. Viewing Music Files
Although music files cannot be played directly within the G Cloud app, a list of your stored music files is displayed for verification, ensuring your music is securely backed up.
To view the backed-up music files, use the Others option on the Home screen of the G Cloud app and select the Music category.
- Files are sorted by date in descending order and grouped by month for easy navigation.
- To make it easier to find specific files, tap the Filter icon in the upper-right corner and filter the listed music files by device.
- Tap on a file to download or share it.
- For bulk actions, select multiple files by long-pressing one file and proceed with selecting the others. This enables options to restore them to their original location, download them to the “Downloads” folder, or share them.
Step 5. Viewing Documents
Similar to music files, documents cannot be opened directly within the G Cloud app, but you can verify their presence in your backup list, ensuring they’re safely stored.
To view the backed-up documents, use the Others option on the Home screen of the G Cloud app and select the Documents category.
- Files are sorted by date in descending order and grouped by month for easy navigation.
- To make it easier to find specific files, tap the Filter icon in the upper-right corner and filter the listed documents by device.
- Tap on a file to restore or share it.
- For bulk actions, select multiple files by long-pressing one file and proceed with selecting the others. This enables options to restore them to their original location, download them to the “Downloads” folder, or share them.
Step 6. Viewing Contacts
The G Cloud app allows you to view the backed-up contacts. Simply, use the Others option on the Home screen of the G Cloud app and select the Contacts category.
- Contact databases are sorted by date in descending order and grouped by month for easy navigation.
- To make it easier to find a specific contacts database, tap the Filter icon in the upper-right corner and filter the contacts databases by device.
- Tap on a contact database to view, search, and restore individual contacts within it. (Learn more)
Step 7. Viewing Messages
The G Cloud app allows you to view the backed-up messages. Simply, use the Others option on the Home screen of the G Cloud app and select the Messages category.
- Message databases are sorted by date in descending order and grouped by month for easy navigation.
- To make it easier to find a specific message database, tap the Filter icon in the upper-right corner and filter the databases by device.
- Tap on a messages database to view, search, and restore individual conversations within it. (Learn more)
Step 8. Viewing Call Logs
The G Cloud app allows you to view the backed-up call logs. Simply, use the Others option on the Home screen of the G Cloud app and select the Call Logs category.
- Call log databases are sorted by date in descending order and grouped by month for easy navigation.
- To make it easier to find a specific call log database, tap the Filter icon in the upper-right corner and filter the databases by device.
- Tap on a call log database to view, search, and restore call logs within it. (Learn more)
Exploring Data via the G Cloud App on an iOS Device
Step 1. Ensure that your G Cloud app is updated to the latest version.
Step 2. Open the G Cloud app and wait for the “Syncing files with server…” process to complete.
Step 3. Viewing Photos & Videos
On the Home screen, all backed-up photos and videos from all devices are displayed by default.
- Files are sorted by date in descending order and grouped by day for easy navigation.
- Use the All, Favorites, Images, and Videos options to filter files by type.
- Open a photo or play a video by tapping on its thumbnail. Once opened, you can share it, download it, add it to your favorites, add it to an album, delete it from the backup, or display its information.
- For bulk actions, select multiple files by long-pressing one file and proceed with selecting the others. This enables options to share, download, delete, or restore the selected files in one action.
Step 4. Viewing Contacts
The G Cloud app allows you to view the backed-up contacts. Simply, use the Others option on the Home screen of the G Cloud app and select the Contacts category.
- Contact databases are sorted by date in descending order and grouped by month for easy navigation.
- To make it easier to find a specific contacts database, tap the Filter icon in the upper-right corner and filter the contacts databases by device.
- Tap on a contact database to view, search, and restore individual contacts within it. (Learn more)
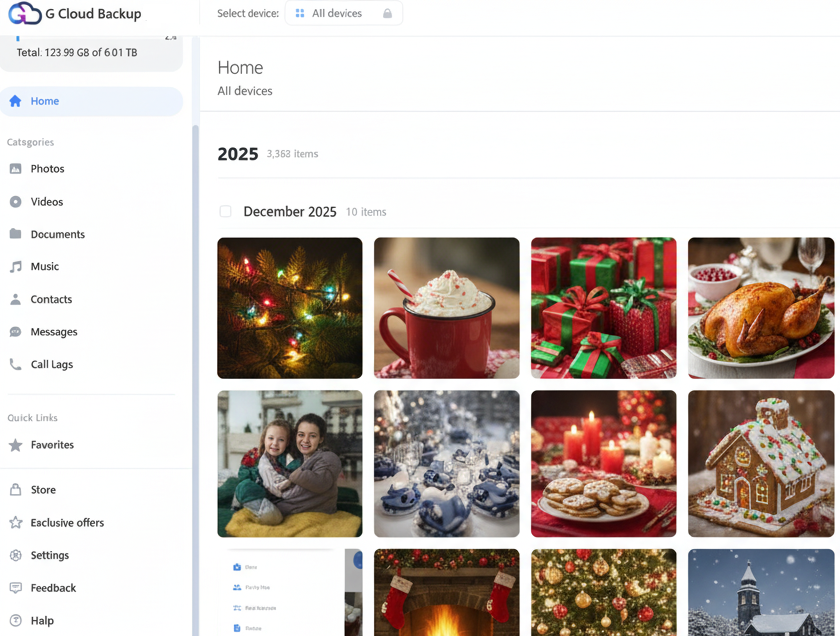
Exploring Data Via the G Cloud Web Console
Step 1. Log in to your G Cloud web console.
Step 2. On the Home screen, all backed-up photos and videos from all devices are displayed by default.
- Files are sorted by date in descending order and grouped by month for easy navigation.
- Open a photo or play a video by tapping on its thumbnail. Once opened, you can share it, download it, add it to your favorites, or delete it from the backup.
- For bulk actions, select multiple files. This enables options to share, download, delete, or add them to your favorites.
Step 3. For a more customized and filtered view, select the desired category from the Categories list on the left-side menu, then filter by device name.